The Ultimate Guide to Building a Shoji Lamp: From Design to Finishing
Introduction
Shoji lamps are a timeless blend of simplicity, elegance, and function. Originating in Japan as part of traditional sliding doors and screens, these lamps bring a warm, diffused light to any room, highlighting the beauty of natural wood and translucent Washi paper.
Today, Shoji lamps have found their place in modern homes worldwide, adding a touch of minimalism and craftsmanship that stands out in a world of mass-produced lighting. Whether you are a beginner woodworker looking for a project that develops precision skills, or an experienced craftsman eager to integrate Kumiko patterns into your furniture, building a Shoji lamp is a deeply rewarding process.
In this ultimate guide, you’ll learn everything you need to design, build, and finish a Shoji lamp, including choosing your design, preparing materials, creating beautiful Kumiko panels, assembling the frame, and safely installing the electrical components. By the end, you’ll not only have a stunning lamp to illuminate your home but also a deeper understanding of traditional Japanese woodworking techniques.

Understanding Shoji Lamp Design
What is a Shoji Lamp?
A Shoji lamp is inspired by the traditional Shoji screens used in Japanese architecture. These screens, made from thin wooden latticework covered with translucent Washi paper, diffuse light beautifully while maintaining a sense of privacy and calm. Shoji lamps apply this concept on a smaller scale, turning the lattice and paper combination into an elegant lighting solution for homes. Its common to mix shoji patterns and kumiko patterns for the panels.
Traditional Dimensions and Proportions
Shoji lamps follow simple, balanced proportions rooted in Japanese design principles:
-
Table Shoji lamps typically range from 20 cm to 40 cm tall, ideal for desks, nightstands, or accent lighting.
-
Floor-standing Shoji lamps can range from 70 cm to 120 cm tall, creating dramatic lighting in corners or entryways.
-
Square or rectangular cross-sections are common, with widths between 10 cm and 25 cm, depending on design.
Key proportion principles:
-
Maintain a harmonious height-to-width ratio (around 2:1 for table lamps or up to 4:1 for tall floor lamps).
-
Keep Kumiko grid and shoji panel spacing consistent to avoid visual imbalance.
-
Allow for light diffusion space between the Kumiko and shoji panel and the bulb to prevent harsh shadows.
Choosing the Shoji and Kumiko Patterns
The Shoji and Kumiko panels are the heart of a Shoji lamp’s beauty. Consider:
Kumiko Skill level
-
Beginners: diamond grid (Hishi-gumi) or Asanoha with minimal intersections
-
Intermediate: sakura (cherry blossom) or complex Asanoha variants
-
Advanced: multiple layered patterns or staggered panels
Shoji patterns for the main panels can be simple and rectangular. Be cautious with complexity here. The more joints you incorporate, the more challenging the assembly and the more precise you need to be when cutting the half lap joints. I produced a video, Insanely Precise Lap Joints for Kumiko / Table Saw Jig Build, that deals with some of these challenges.
Light diffusion goals
-
Denser patterns block more light and create strong shadows
-
Open patterns allow more light through, giving a softer glow
Lamp size and purpose
-
For small table lamps, keep patterns simple to avoid overwhelming the small surface area
-
For tall floor lamps, integrate repeating Kumiko patterns to add rhythm and visual continuity
Design Aesthetic Considerations
Shoji lamps integrate well with minimalist, Scandinavian, and Japanese interiors. When designing:
-
Choose light-colored woods like hinoki, spruce, or basswood for a traditional feel
-
Use woods like walnut, oak or cherry for a modern aesthetic
-
Select Washi paper color and texture to match room ambiance; white for brightness, off-white for warmth, and tinted papers for dramatic effect
Planning Your Shoji Lamp Design
Before cutting any wood:
-
Sketch your lamp dimensions to scale or use SketchUp to visualise proportions - I offer a Sketchup file in my shop that already has all of the dimensions and layout for the main body and shoji panels
-
Determine your Kumiko pattern dimensions and how they integrate into each frame panel
-
Plan joinery details (e.g. mortise and tenon, lap joints) to match your tools and skill level
-
Ensure your design allows safe installation of electrical components, keeping wires clear of wooden surfaces that might heat up
Pro Tip:
Print your design and Kumiko grid at full scale to use as a reference when cutting parts. This ensures accuracy and speeds up layout.

Tools and Materials You Need
Building a Shoji lamp requires precision and care, but the tools and materials are relatively minimal compared to larger furniture projects. Below is a comprehensive list to prepare before starting. Some of these tools are traditional tools for this type of work. When I make shoji and kumiko panels, I use a cross cut sled on my table saw for the lap joints on the shoji panels. For the kumiko panels, I use kumiko blocks and block plane. I do use a Dozuki saw and cross cut jig to cut Kumiko strips to final length as I find this is more accurate and repeatable. I made a video showing the steps for Making Kumiko for the Top of a Shoji Lamp.
Essential Hand Tools
Marking Tools
-
Marking knife for precise layout lines
-
Combination square or try square for accurate right angles
-
Pencil (preferably 0.5 mm mechanical) for general marking
Cutting Tools
-
Dozuki saw (Japanese back saw) for fine joinery cuts
-
Kanna (Japanese hand plane) or block plane to achieve final dimensions and clean surfaces
-
Chisels (6 mm, 12 mm, and 18 mm recommended) for joinery work
Measuring Tools
-
Steel ruler for marking Kumiko strips
-
Calipers (optional but recommended) for checking Kumiko thickness consistency
Assembly Tools
-
Small hammer or mallet for tapping joints together gently
-
Clamps (light pressure) for holding frames during glue-up
Optional Power Tools (for efficiency)
While Shoji lamps can be built entirely with hand tools, certain power tools increase accuracy and reduce build time:
-
Table saw or bandsaw for ripping thin strips
-
Thickness planer for dimensioning wood efficiently
-
Drill or drill press for wiring holes
Materials
Wood
Choose straight-grained, stable woods to avoid warping or splitting in thin parts. Traditional options:
-
Hinoki (Japanese cypress)
-
Spruce
-
Basswood
Modern alternatives:
-
Maple
-
Cherry
-
Walnut
-
Oak
Tip: For your first lamp, select a soft wood like basswood to ease cutting
Washi Paper
Washi paper gives Shoji lamps their iconic light diffusion. I use Awagami Unryu paper which I am easily able to find here in Switzerland. There are quite a few options though. I would suggest experimenting a bit with different kinds of paper.
-
White untextured Washi for maximum brightness
-
Off-white or cream Washi for a warmer, traditional glow
-
Colored Washi (e.g. blue, pink) for dramatic accents or matching interior themes
Ensure your paper is laminated or fibre-reinforced if you want extra durability, especially in humid areas.
Adhesives
-
Wood glue for joinery assembly (hide glue or PVA work well)
-
Rice glue or glue stick for attaching Washi paper (avoid water-based liquid glues that wrinkle thin Washi). I use normal wood glue to attach the paper to the panels and I don’t have any issues as long as its applied very thin. I made a video showing a Trick for applying paper to Shoji and Kumiko panels
Electrical Components
-
LED bulb (low-heat, energy-efficient)
-
Lamp holder/socket sized to your design
-
Cord set with switch
Safety note: Always use electrical components certified for your country’s standards (e.g. CE, UL) and ensure bulbs do not touch wooden parts.
Safety Equipment
-
Dust mask or respirator when sanding or cutting woods like walnut
-
Hearing protection if using power tools
-
Safety glasses
Workspace Preparation
Pro Tip:
Label your cut parts with painter’s tape as you dimension them. This avoids confusion during assembly and ensures your Kumiko and Shoji panels are built with the correct orientation.
Preparing Your Materials
Proper preparation ensures your Shoji lamp will be precise, sturdy, and beautiful. This stage sets the foundation for smooth joinery and clean Kumiko panels.
Milling and Dimensioning Wood Accurately
Before cutting parts to their final sizes, rough cut your wood pieces slightly longer and wider than needed to relieve internal stresses. Sticker the wood and let it sit overnight and then mill it to final dimensions.
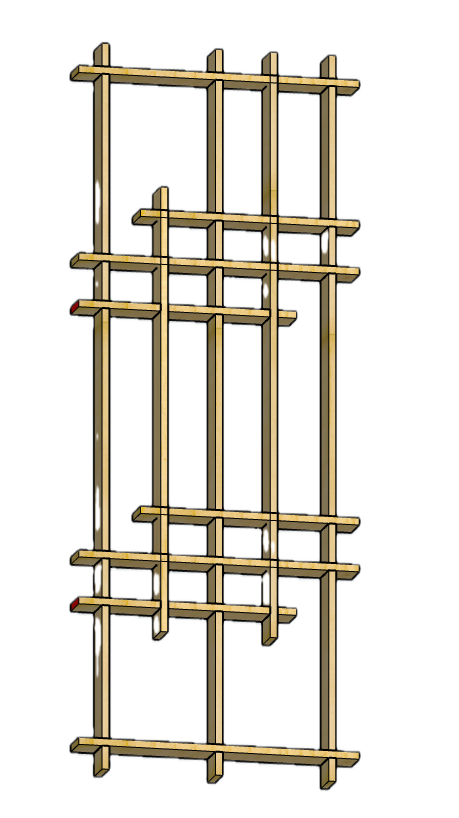
Frame Dimensions:
For my lamps, I normally mill the 4 uprights to about 25mm square and about 300mm long depending on the size of the lamp I’m building. I aim for 15mm square for all of the cross pieces and I add about 10mm to each side plus the width of the upright and the width of the shoji panel. You can either make the panel first and then cut the 8 cross pieces to final length or the other way around. I have a full Sketchup model available on my site that shows all of the detailed dimensions for one style of Shoji lamp.
Pro Tip:
Check your final dimensions frequently with calipers or a ruler and use those numbers to set the dimensions of the joints. Consistency is critical, especially for Kumiko strips and frame pieces.
Preparing Kumiko Strips to Consistent Thickness
Kumiko requires accuracy within ±0.05 mm for clean and tight-fitting joints. Inaccuracies here will lead to difficult and inconsistent assembly later and the panels won’t fit properly in the frame. There are multiple ways to get there. I use the first option because I found it to be the most repeatable.
-
Rip thin strips using a dedicated Kumiko thin strip ripping sled on the table saw. I have a video on how to Make a Strip Cutting Sled.
-
Rip strips to rough width slightly oversized on a table saw or bandsaw. Plane to final thickness using:
-
A Kumiko thicknessing jig with a hand plane for precise control. I have a video on How I Precisely Thickness Kumiko Strips with a Handplane
-
Use an off-the-shelf thin strip ripping jig on the table saw
 Please
accept marketing-cookies
to watch this video.
Please
accept marketing-cookies
to watch this video.
Tips for Consistent Kumiko Preparation
-
Always work with straight-grained wood to avoid tearout and breakage
-
Maintain a sharp plane blade or chisel for clean, accurate cuts
-
Prepare a lot of extra strips in case of mistakes during Kumiko assembly
-
Dry fit and test the assembly of the strips by cutting a half lap joint. The fit should go together with just a little friction but not too tight.
Making the Kumiko and Shoji Panels
Creating the Shoji and Kumiko panels is the most intricate and rewarding part of building a Shoji lamp. This section guides you step by step to achieve clean, professional results.
Introduction to Kumiko Joinery
Kumiko joinery involves assembling thin, precisely cut wooden strips into geometric patterns without nails or screws. Each piece is carefully notched to interlock, creating strong and elegant lattices.
The most common beginner pattern is Asanoha (hemp leaf), while simple diamond grids (Hishi-gumi) are ideal for first-time Shoji lamp builds.
Cutting Kumiko and Shoji Strips to Length
Measure the internal dimensions of your lamp panel frame. I normally make Shoji panels for the 4 larger rectangular sections and a Kumiko panel for the top square section. I always cut my strips for the panel frame (made from the same strips you will use for the Kumiko and Shoji patterns) 10mm longer and I cut them off at the end. While I prefer to use a cutting jig and a Dozuki saw to cut the Kumiko pattern pieces, I cut the Kumiko pattern and Shoji strips on a dedicated cross cut jig on my table saw. I made a video called Insanely Precise Lap Joints for Kumiko / Table Saw Jig Build that shows this in more detail.
 Please
accept marketing-cookies
to watch this video.
Please
accept marketing-cookies
to watch this video.
Kumiko and Shoji Half Lap Joints
Both frames need half lap joints. While this was traditionally done on the bench with a special jig and a saw, I prefer to use a dedicated cross cut sled on my table saw. Since I cut the strip widths to match the width of my table saw blade, I can use the same blade to cut the joints for a nice fit. The jig also ensures the correct spacing so that the frame fits snugly into the main lamp frame.
Kumiko pattern
After using a jig to cut the pieces to length, use a Kumiko jig and either a wide chisel or small plane to cut the angles on the ends of the Kumiko pattern pieces. The pattern will start out as trial and error until you get the dimensions dialed in for each piece. This section of this video about Making Kumiko for the Top of a Shoji Lamp - Detailed shows the back and forth in a bit more detail.
Assembling the Basic Grid
Assembly is the fun part. I normally use something to apply a very small amount of wood glue to each half lap joint as well as to the cut angles on the ends of the Kumiko pieces. I’m careful not to use too much so it doesn’t press out and become visible later. After the glue is dry, I cut off the 10mm ends completely around the panel frame. I made a video about Making Kumiko for the Top of a Shoji Lamp - Detailed where I show how I make the frame.
Sanding and Finishing
Once assembled, lightly sand the 2 sides of the Shoji and Kumiko panels. The panel should already be flat but a little sanding ensures there aren’t any high areas. It also removes any fine “hairs” on the edges leftover from cutting the strips.
As much as it seems wrong not to do, don’t apply finish to the panel. Applying finish would not only be difficult to do, it would also make the Washi paper difficult to adhere to the panel. And Michael Pekovich doesn’t do it either so that's enough for me.
Final Inspection
Check that all the joints are still attached. If you find one that isn’t, a spot of CA glue and activator is a quick fix.
Applying the Paper to the Panel
Using rice glue or methylcellulose paste is more challenging, but it is the traditional method.
-
Mix rice glue to a thin, paintable consistency
-
Brush a thin layer onto the wooden surfaces
-
Place Washi paper as above, smoothing gently
-
Allow to dry thoroughly before trimming
I prefer to use wood glue and spread it on the frame using an ink roller. This makes a very thin coating which doesn’t bleed into the paper. I have a video showing this Trick for applying paper to Shoji and Kumiko panels
Trimming Excess Paper
Once the glue has fully dried, use a sharp utility knife to trim excess Washi along the frame edges. Work slowly and with a brand new blade to avoid tearing delicate fibres.
Assembling the Lamp Frame
With your Kumiko panels complete, it’s time to build the lamp frame to house them securely and beautifully. Precision during this stage ensures structural integrity and a refined final appearance.
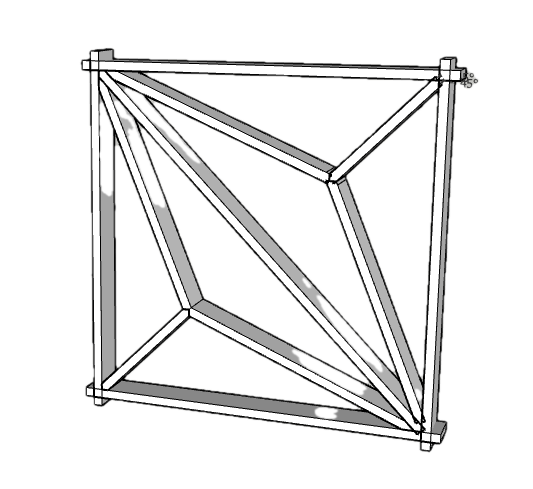
Traditional Joinery Options
There are a few options for joinery. While mortise and tenon is strong, its are not a beginner joint. I’ve never tried this or floating tenons for parts this small. Bridle joints could also be a good option but I prefer to use half lap joints because I can do this using a dado stack and a sled to ensure the spacing is exact to receive the panels later. The one downside is that you need to cut 2 half lap joints on each end of the upright pieces (25mm parts) and this leaves a 10mm piece of wood which can split during assembly. I offer Sketchup PLANS which shows all of the details described here.
Light Platform
The square frame at the bottom of the lamp (15mm parts) requires some sort of platform to support the lamp. I normally rabbet the edge of 2 opposite sides and then install a plate about 5mm thick. Afterwards, I drill a hole to accept the lamp holder.
Assembly Process
The assembly process is pretty straightforward. Assemble the top and bottom square frames (15mm parts) and then assemble the those to the 4 uprights. Make sure you don’t overdo it with the press fit on this part. If the joint is too tight, that 10mm sliver will split. Once the glue is dry, the whole thing is very stable though. This section of the video I Couldn't Believe How Well This Worked / Making a Shoji Lamp shows the detail for marking and assembling the pieces.
Clamping and Squaring
Although it should all be square, I always clamp between parallel boards to ensure it doesn’t move. If you get a small twist in the frame, the panels will not fit properly.
Finish
Although you can apply finish after the glue is dry, I prefer to use painters tape to cover the glue joints and apply finish while the parts are still unassembled. I keep it very simple and use a couple of coats of Shellac followed by wax. Its fast and looks great.
Installing the Kumiko Panels
Check the fit of the panel frame inside the lamp frames. This sometimes requires a bit of fitting.
If its too tight, I sand a small amount at a time while checking often.
It shouldn’t be loose but if it is, my trick to to apply a small bead of CA glue and spray activator. This creates an almost invisible bump which can be used to tighten up the fit.
Preparing for Electrical Components
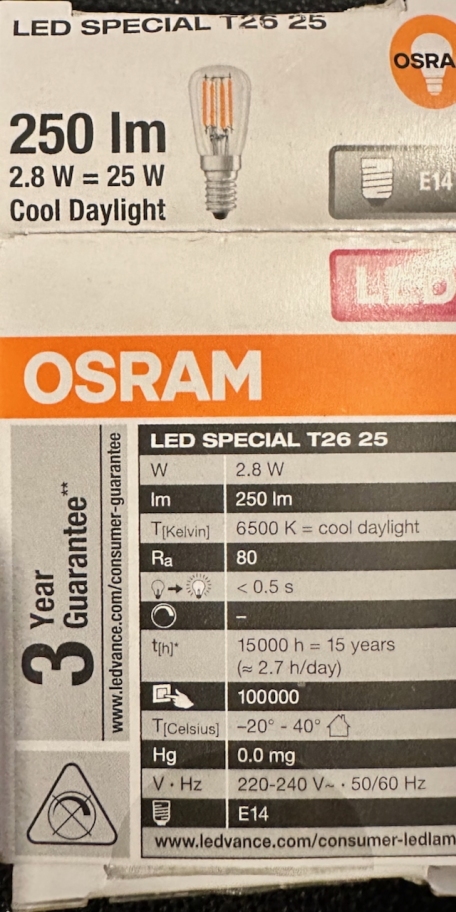
I always use pre-wired E15 style cords with switches. I comfortable with wiring, I am not an electrician nor am I certified to build my own wiring. An off the shelf solution is much safer especially if you sell or give these away as gifts. The lamp holder simply sits in the hole I drilled earlier with a couple of threaded parts that fit around the wood.
For the lamp, I am simply using an E15 LED like the one in the picture below.
Place your lamp in a dim corner or near your tatami mat area to appreciate its soft, calming glow. The traditional craftsmanship and modern function combine to bring warmth and elegance to your living space.
My passion for woodworking extends beyond single projects — it’s about designing furniture that reflects both the maker’s hand and the client’s vision. Through my custom woodwork furniture work, I create pieces that merge fine craftsmanship with personal function, whether it’s a one-of-a-kind cabinet, table, or lighting design.

(you must be logged in to Facebook to see comments).